


This was one of my favorite, and most successful, teen programs that I have done over the past year. We created artwork that incorporated battery powered lights and circuits within the pictures themselves (how cool is that!). I will say this though, this is not a craft that you can pull off with the stuff laying around the art room. You will need some specialty items, but they are well worth it, especially if your library will purchase the items or reimburse you for the cost!
Here’s what you need:
- Paper Circuit Template (pictured below)
- Copper Circuit Tape
- Two Pronged LED lights
- Flat-Round Lithium Batteries
- Glue Sticks
- Crayons/Markers/Colored Pencils
- Scissors (for prep)
- Sello tape (scotch tape) / Binder clip
For prep:
- Cut strips of the copper tape about 12 inches long
- Print out the paper circuit template
- Take batteries out of their casing and remove any protective plastic or adhesives
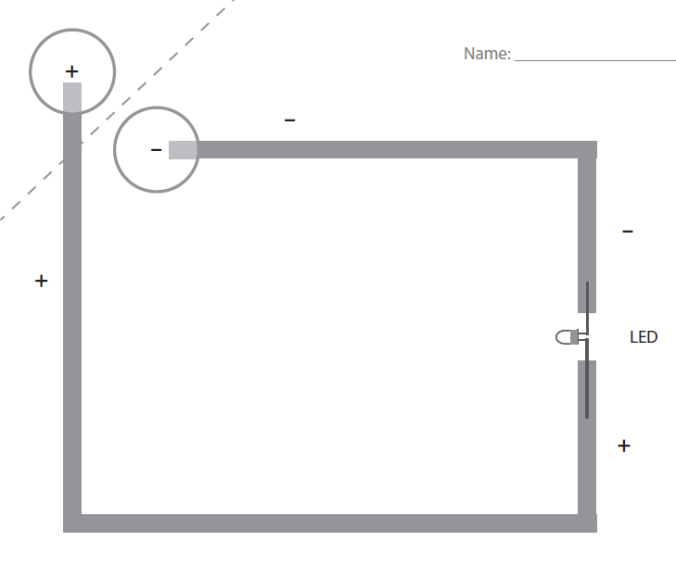 Essentially, you are going to just follow along with the template. To start, give each person two strips of the copper tape. Separate the copper foil tape from the white backing paper. The tape will curl so be careful not to allow it to stick to itself. Start at a battery location Begin sticking the copper tape to the circuit page at one of the circle battery locations. Stop just before a corner or LED location. To create a corner, first fold the copper tape the opposite direction of the turn. So if you are turning right, first fold the tape to the left. Next, fold the tape the direction of the turn. To connect two pieces of copper tape, you cannot just stick one on top of the other. The adhesive (sticky part) is not conductive so it will break your circuit. Instead, double the tape over near the end and stick it to itself. That way, both sides of the end will be conductive. Then place the doubled end on top of another piece of copper tape that has already been stuck down and place a piece of clear scotch tape over the connection. Start at the other battery location Begin sticking the copper tape to the circuit page at the other circle battery locations. Stop just before a corner or LED location. Batteries have a positive and a negative side. Coin cell batteries are labeled with a plus (+) symbol on the positive side (see first image above). Place the battery with the negative side down on the negative battery circle location. The positive side should face up. Bend the corner of the circuit page along the dashed line (—–). Use a binder clip to hold the battery in place. Be sure to leave a gap between copper tape when adding an LED (Light Emitting Diode). If the copper tape from one side of the battery touches the tape from the other side of the battery, it will short circuit and the circuit will not function. LEDs have one longer “lead” wire and one shorter lead. The longer lead is positive and the shorter is negative. Start by bending the wires out to each side. Place the LED on top of the gap with the lead wires touching the copper tape above and below the gap. If you press down on the leads with your fingers, you should see the LED light up. If it does not, try these troubleshooting ideas:
- Make sure the battery’s positive side is facing the positive path (labeled with “+”) of the copper tape.
- Try flipping the battery over to see if that lights the LED. Sometimes batteries lost their charge so try a different one just in case.
- Smooth down the copper tape, especially corner turns and places you attached two pieces of tape together. You may want to use the edge of scissors or your fingernail to do this. The copper tape should be as flat as possible.
- Try flipping the LED around so that the opposite lead is facing up. Be sure to hold down the leads firmly when testing your circuit.
- Sometimes LEDs go bad so try a different one just in case.
- If the LED lights up, hold it in place and tape down both leads with clear scotch tape.
Once you get the circuit working, you can begin the process of turning the circuit into art. In the above pictures, you can see an example where one of the teens draw a wizard. He lined up the LED light to be at the top of the wizard’s staff! Too cool! The possibilities at this point are basically endless. Some of the teens even tried their luck at using multiple lights in a single circuit! Good luck and have fun with this teen tech craft!
